Friday 31 July 2015

Bubble art

Kids love painting. And kids love blowing bubbles. Well even better than either of those is...


This activity is so simple to set up and kept D busy for ages. In the end I had to tell him to clear everything away because it was tea time!

I first saw the idea here. Her child was quite a bit older than D though so I wasn't sure if he'd be able to do it and/or find it fun. But it was definitely yes on both counts :)

All you need is some paint and some bubble mix. Both mine came from Poundland so you definitely don't need any expensive equipment! Squirt some paint in a small cup/container (I used our Babycups as happened to have them in the cupboard and they were the perfect size!) and then top up with bubble mix. Aim to have a ratio of about 1:2 and then mix gently (you don't want to make it all frothy). Then lay out your paper, grab your bubble wand and you're good to go...

I can see a hundred different variations of this activity in my head but this is what we've done so far:

Using watercolour paper

This was the first way we tried. I love using watercolour paper for things like this as it absorbs any excess moisture and doesn't warp as it dries.


Just getting going

POP!

Yep he then started blowing bubbles on his hand!

D got the hang of it much more quickly than I thought he would :)

Love the finished pics

Under a blacklight

Our neon paints (from Rainbow Creations) just keep giving and giving :) here I just used them instead of regular paint and then set up the blacklight in D's bedroom (the darkest room in the house).

Blacklit bubble!

Warning - there is bubble splash back so your hands will get neon-ed!!

Love how these pics look great under the blacklight or in daylight!

How cool is the splatter pattern?!


The neon colours also look great away from the blacklight
With a bubble gun 

Bubble-tastic

We also did this using our blacklight - not a great pic as it was dark and D got a bit excited by the massive pile of bubbles! Next I want to use the bubble gun with regular paint in the daylight and maybe set up a long track of paper in the garden and let D run up and down it shooting bubbles :)

On a giant bit of paper

Bubble train...

He loved popping the bubbles and watching them splat outwards
D really enjoyed having a massive blank canvas and he spent a long time blowing bubbles. We also talked about the different colours and how the paint collects in each bubble and then splatters out when the bubble pops.

You can see the yellow paint collecting inside the bubble


Finished picture
And lastly we tried it with lots of straws 

Ginormo-bubble

This was actually D's least favourite variation of all - maybe because the straw bundle was quite large for him? But he still enjoyed making bubble mounds and then whisking the paint/bubble mix together :)

******

This activity was so fun (even my OH couldn't resist joining in!) and you can make some lovely pictures. Some of D's I've mounted on coloured card so he can use them as thank you cards and others I've cut to make homemade gift tags. If you use regular paper instead of the thicker watercolour sheets you could even use it as wrapping paper.

I'd love to see any pictures if you try it :)


Tuesday 28 July 2015

Cooking with two: spinach and onion tarts

I've done quite a few toddler cooking posts before, with easy recipes that toddlers can pretty much make by themselves, but as D gets older he can obviously do more complex things (breaking an egg is like yesterday's news to him) but Iz is only just starting on her culinary journey... So I'm going to post recipes every now and again that are perfect for doing with a toddler and a baby - with some very simple tasks that the baby can do but also enough tasks to stop the toddler being bored - for everyone with 2 or more little ones, you can still cook with them :)

So here is the first offering...

Spinach and onion tarts

Ingredients:
Ready made puff pastry
Spinach leaves
Cheddar cheese 
Red onion

Prep work*: 
- un-chill puff pastry
- chop up onion
- cook spinach (I microwaved it)
- grate cheddar
- grease baking tray

*you can do these stages with or without your toddler helping - D loves being involved with everything so shouts "Me help you! Me help you!" whenever I wander into the kitchen!
 
Next steps:

1. Assemble baby and toddler near the work surface (make sure anything you don't want them to touch is waaaay out of reach as these little people have *super* long reaches!)

2. Cut shapes out of puff pastry (Iz tried but needed help with this, D could do it fine on his own)


3. Sprinkle each with a layer of cheese, a few pieces of onion and some cooked spinach (Iz could do all this, but may have also sampled a fair bit too! Lol)


4. Top with another layer of cheese and transfer to a baking tray (as you can see, Iz may have picked up her sampling tendencies by watching someone else...)


5. Add an uncooked spinach leaf to the top of each tart (D banned Iz from helping after she started stealing the toppings and he finished them off himself. Gotta love toddlers!)


6. Cook at approx 160 degrees fan for 10 minutes (until cheese all melted and pastry lightly golden brown)

D also made a few teddy shapes and added some star sprinkles as their eyes and buttons. We cooked those with the tarts and he ate them for pudding.


Food is always more yummy when you make it yourself :)


These tarts were really delicious - the onion was soft and sweet after being cooked and the iron-y aftertaste you sometimes get with spinach was non-existent due to the cheese. I loved that D happily ate these but if I'd given him a pile of spinach or cooked onion I doubt he would've looked twice at them!

******

We had lots of fun for our first time cooking with both of them and I'm really happy that Iz is happy helping in the kitchen already. D started cooking at 16 months so Iz has beaten him by a clear 7 months :) this recipe was quite simple for D but it meant that he basically took charge and did nearly all of it himself (after I'd chopped up the onion and spinach) - I was only called in to referee when he felt Iz was eating too much!

Have you done any cooking with young ones or with two together? I'll be trying out other simple recipes over the next few months and would love to hear any different ideas that we might not have tried.

Amazingly healthy cake

So I've tried making healthy cakes before when D was younger but they were always really heavy and not very tasty. Having played around with this for a while I now have a super delicious COMPLETELY SUGAR-FREE cake recipe that even I love eating :)


The bests bits about it are:
- no refined sugar. At all
- it has lots of fruit in it - that's right, a slice of cake can now count as 1 of your 5-a-day!
- you can do it all easily by hand (no electric mixer required) and super quickly. I whipped up 2 double-layer rainbow cakes and a batch of cupcakes in about an hour the other night!

Furthermore it has:
- no honey (not suitable for babies under 12 months)
- no added salt
- no weird ingredients like flax/spelt etc that some "healthy" recipes pay for

When thinking about making a smash cake for Iz's first birthday I really wanted to find a healthier option than regular cake as Iz can be rather greedy on occasions and so I wouldn't have been surprised if she had just sat and eaten the whole cake in one sitting! The icing also had to be healthy and ideally sugar-free and here it is... don't let anyone ever tell you that you can't have your cake and eat it :)

Doing the initial taste test...

Cake recipe

8oz flour (you can use wholemeal or white flour)
1 tablespoon baking powder
1 teaspoon bicarbonate of soda
3 bananas
1 large egg (or 1.5 medium ones)
200ml fruit purée (eg 2 Organix fruit purée pots)
60ml veg oil
1 teaspoon mixed spice
1 teaspoon vanilla extract

1. Combine dry ingredients (flour, baking powder, bicarbonate of dos, mixed spices)
2. In another bowl mix wet ingredients (mashed bananas, eggs, fruit purer, oil, vanilla extract)
3. Mix the 2 bowls together
4. If you want to colour your cake then separate the batter into different bowls now and colour each one (you can read full instructions here)
5. Spoon into a greased cake tin and cook in a pre-heated oven (approx 180 degrees) for 20-25 minutes - make sure you check it with skewer as everyone's oven is different though!

Seriously how simple was that?

Raw mixture

Once coloured and cooked
Icing recipe

1 tub full fat Philadelphia
1 pot fruit purée (I used a mini Ella's kitchen fruit pouch but you could easily make your own instead)
1-2oz cornflour
2 teaspoons vanilla extract

All you need for healthy delicious icing

1. Have the cream cheese at slightly chilled/room temp
2. Slowly beat until smooth being careful not to overbeat it (that'll make it more runny)
3. Stir in the fruit purée and a few drops of food colouring (I used colour gels)
4. Add 1oz of cornflour, mix carefully and then add more cornflour as needed
5. Refrigerate when not in use

Before coloring
Ready for icing to occur
The final product :)

When making a smash cake you want the icing to be slightly runny so it's easy to make a mess. If you're making the cake as a proper birthday one that you want to cut slices from then add slightly more cornflour as this will stiffen the icing more. I added slightly less cornflour to Iz's icing (nearer 1oz rather than 2oz) and you can tell in the pictures that it is more runny than D's:

The squidgier the icing the better during a cake smash!

Mmmmmmm mess

So there it is. Delicious cake (and icing), packed full of fruit with NO refined sugar at all and suitable for babies under one as there's no honey or salt either. I'll post some more pictures of the cake smash in a separate post but if you try this recipe I'd love to hear what you think :)


Sunday 26 July 2015

"Crystal Maze" box

Sometimes it's funny - I do an activity for Iz and completely underestimate how much D will like it. This is a prime example!


I've written about baby-specific sensory play before (for example the ribbon play for babies) and I do try to do activities that both her and D can enjoy, but invariably there's a lot more scope to do things with D so sometimes I feel bad that she gets left out... so it's nice to make something specially for her.

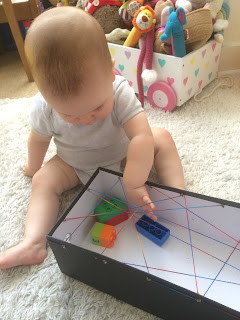
All you need is a shoebox and some string/wool.
Punch some holes in the box and thread the wool in what ever pattern you want.
Simple :)

Ooooo what's this?


Then add a few objects to the box and let your baby have fun trying to get them out!

Trying to get the duplo blocks

Balancing a giraffe on a string crossroads

She quickly worked out it was easier to get to things when the box was on it's side...

Yep it even got used as a giant shoe!

D quickly adopted the box as "Elsa's bed" and we all had to be quiet whilst Elsa slept... I'm never going to complain about D enforcing quiet time on everyone!! Lol

"Ssshhhhh Elsa's in the box!"


After they'd both played with it for a few days I decided to make it a bit more challenging and added another layer of wool below the first so there was now 2 layers of criss-crossed strings. This introduced a whole new layer of complexity and it was very cute watching Iz explore how much harder it was to reach the bottom now.

Showing her how it's done :)

Uh oh she's trying to get Elsa!!

Adept at getting past multiple string layers now


******

So there it is - a very simple sensory play idea that's enjoyed by both babies and toddlers. You could easily make it harder by having even more additional wool layers as each one will add to the complexity of the movements they need to do to reach the toys. It is great fine motor practice, logical thinking, task flexibility and problem solving (lots of executive function skills) - who knew a shoe box could be so educational?!


PS. If you're wondering about the name I chose for the box then you are obviously either too young to remember the Crystal Maze or aren't from the UK!


Friday 17 July 2015

Water bead play for toddlers

A few months ago I wrote about water bead play ideas for babies (see here) and an awesome waterbead waterbed but I originally got them for D, not Iz, as they are NOT taste-safe and you need to watch carefully to make sure none are eaten. Luckily D is now out of the "must-eat-everything" stage, although I do always re-iterate the "no eating" rule at the start of any water bead activity...


So here are a few of the things D has done with them over the last few months:

Sorting colours

Pretty simple but it kept D busy :) all you need is an assortment of colours all mixed up in a bowl and then make yourself comfy whilst your toddler spends the next 30 minutes separating out the colours!


Just squishing

If you've never felt waterbeads you won't understand how nice this is to do. They are soft and squidgy but not slimey - perfect for squishing :) and at the same time make sure you "bounce" them (but don't lose them!!).

Shaving foam and waterbeads

We sprayed foam onto a cheap baking sheet and then D arranged the beads to make patterns. Or just randomly dropped them wherever. Using tweezers he then tried to pick them all up again (this is pretty tricky and after a few minutes he got annoyed and used his fingers instead...) and put them in an ice cube tray.


Painting with waterbeads

A variation on marble painting this was great fun. Put a piece of paper in the bottom of a high-walled container (we used a roasting pan from Poundland) and dip some waterbeads in paint. Drop the beads onto the middle of the paper and swivel-swivel-swivel! Let dry and you have a waterbead masterpiece :)


Waterbead "soup"

Super simple but fun and also good manipulation/fine motor practice. We used a big tub with water, a smaller "bowl" for the soup, some silicone cupcake cases and a spoon to do the creating. D had fun scooping, swishing and putting groups of waterbeads in the cupcake cases.He happily played in here for over 20 minutes (at which point Iz woke up from her nap so the water beads got put away!).


Waterbead ice cubes

I froze some waterbeads in individual ice cubes (some were even turtle shaped but it ended up being pretty hard to tell that when frozen!). I then gave D a tub of yellow coloured water and all the ice cubes in a tray. He dropped them into the tub one by one, watched them melt, watered them with the watering can (Iz LOVED watching this in action!) and then caught all the pieces in a net at the end. This was the only waterbead activity listed here that Iz was present during and she was *very* heavily supervised, making sure she did not put any beads (or fragments of) anywhere near her mouth.


Frozen waterbeads 

I froze all the waterbeads that were left after we'd done all the above activities and saved them for a really hot day. Incredibly the British weather obliged a few weeks ago so out they came. First D swooshed them around the tray, then he tried to break them up with a spoon. Next a water gun came out, before a bottle of water.


Once they were all defrosting he spent ages transferring them from the box, onto the lid, and back into the box again. He loved trying to catch them on the spoon!


Note: once you have done this the waterbeads aren't reuseable again - once frozen and defrosted they become fractured and break up into smaller pieces.


******

And he obviously enjoyed the skittles and giant water bead water bed we'd previously made and played with too :)


******

Disclaimer: as with any activity involving your toddler/baby, use your own judgement and common sense. I always closely supervise any sensory play and always inspect items for wear/tear carefully before each playing session. Water beads are NOT safe if ingested. Always make sure you are confident with the safety of whatever your child is playing with.