If you've ever read my blog around either of the kids' birthdays then you'll probably know I like making cakes for them. I don't cook all the time but do like to try something a bit different to celebrate their birthdays.
D is really into Spiderman. He's never watched it, I have no idea where he's ever seen him... But along with most preschoolers, he seems to be numero uno. So this year I decided to make a Spiderman Lego mini figure cake :)
Disclaimer: I have zero experience in using icing/fondant in this way - this was my first try. I even had my husband on standby to drive to 24 hour Tesco in case it all went wrong and a replacement cake was needed... But it was actually pretty easy and the end result was really cool (or so I thought anyway!!).
How to...
1. Make the cake mix (I cheated and used a Betty Crocker box recipe. Easy and delicious!)
2. Liberally spray the mould with lots of cake release spray - make sure you get every nook and cranny. Then pour the cake mix into the mould - I used a piping bag with the tip cut off which was an easy way to make sure every area was fully caked-up.
3. Depending on the size of your baking tray, use some cookie cutters to "wedge up" your cake mould so the man doesn't get distorted during cooking
4. Cook the cake for way longer than packet says! I started testing mine with a skewer after 25 minutes (time stated on cake mix packet) but actually had to cook it for 45 in the end!
5. Once cooked, remove from oven and leave in the mould for about 30 minutes. Then trim off any excess you need to and flip it over onto a cooling rack. If you sprayed it enough in step 2 then it should slide out very easily.
6. At this stage you can freeze the cake if you've made it in advance. Wait until it's fully cooled and then carefully wrap fully in clingfilm before freezing. You can then decorate from frozen at a later date.
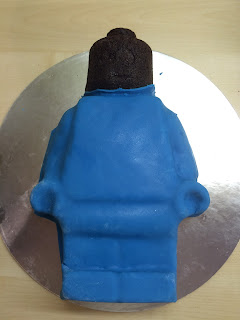
7. Roll out some blue fondant. I used a silicone mat with a sprinkling of cornflour on top to stop it sticking. Then just drape it over the body and legs of your man. Smooth down carefully and trim around the neck.
8. Next roll on red fondant and drape over the head, smoothing it down and trimming it around the neck where it meets the blue.
9. Push the fondant under the edge of the cake and trim all round the edge.
10. Cut out a red breastplate (I used a kitchen roll template to help me get the right size), the belt and gloves. Also use some white fondant or gum paste to make the eyes. Paint the underside of each item with a little water so it sticks to the base fondant.
11. Colour some gum paste with black food colouring (watch out for your hands!!) and mould a spider. Leave to dry - overnight if possible so the legs are nice and secure!
12. Paint on the web lines. For the torso I used a bottle of black icing and just cut the tip off to make a fine nozzle. On the face I painted using food colouring so I had slightly more control.
13. Add any extra decorations you want - I added D's name on the feet and piped chocolate icing around the outside.
14. Add some candles, show to your impressed husband/child and enjoy :)


No comments:
Post a Comment